Friday, January 21, 2011

Glass Photo Charm (and magnets!) Tutorial

As promised, here's the step-by-step walkthrough on how to complete our projects from this month's meeting!  Sorry for the lack of photos (I didn't think to have someone snap pics while we were crafting on Tuesday - oopsie).

Glass Photo Charm


Materials Needed:


7/8" square glass tiles
Diamond Glaze
Small photos or patterned papers*
Jewelry bail
E-6000 glue
Small scissors


(click on each item to see a Google shopping result)

*Your photo will need to be cropped to size (7/8" square, 300 dpi) in order to fit on these tiny square tiles.  You can do this in most photo editing software programs.  Inkjet printed photos will NOT work well for this project as the ink may smear/bleed when you apply the glues.  I recommend having multiple photos printed on photo-quality paper.  Bunch 'em all up on a 4x6 and send them to your nearest 1-hour photo lab or take to a print shop and ask them to print for you on a thicker stock paper, using a laser jet.

Shopping tips:

Diamond Glaze can be ordered through our very own 2Katies!
You can purchase sterling silver-plated jewelry bails at Hobby Lobby in the leatherworking section.
E-6000 is sold at Walmart in the craft glue section.

How To:
  1. Select your photo and position your glass tile on top of it to make sure it looks right.
  2. Spread a dime-sized amount of Diamond Glaze onto the flat side of your glass tile.
  3. Press glass tile onto your photo - be sure & position it correctly, then hold all 4 corners down for a few seconds.
  4. Let dry for approximately 1 hour.
  5. Using small, sharp scissors, carefully trim the excess paper from around the edge of the under side of your tile.
  6. Apply a small amount of Diamond Glaze to the back side of your tile.  Use your finger to go around the edges of the back of your photo, as well.
  7. Let dry for approximately 1 hour.
  8. Place a small dab of E-6000 onto your jewelry bail and press it onto the back side of your tile (be sure you place it in the correct spot!)
  9. Let dry for 24-72 hours.
That's it!  Easy peasy, right?  :)

If you're looking for some fun little things to use on your charms, check out all the inchies available on Etsy.  These are perfect for little charms, but remember that inchies are, well, 1 inch.  And our glass tiles are 7/8"... so, basic math tells me that the inchies will be sliiiiiiiiiightly bigger than our glass tiles, yes?

You can also order glass tiles in other sizes - circles, rectangles, blah blah blah.
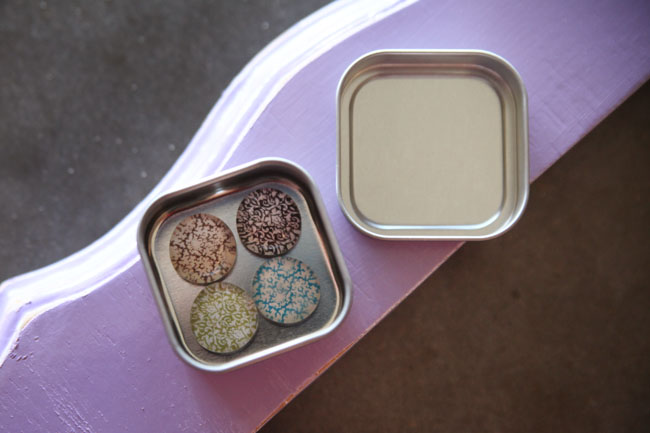
Photo Magnets


Materials Needed:

Glass floral marbles (Hobby Lobby's work best)
Diamond Glaze
Small photos or patterned papers
Small Neodymuim magnets (these are the super strong ones)
Hot glue gun & hot glue 
Small scissors

For the photo magnets, you'll follow steps 1-5 from the jewelry charm... you can also do step 6 (Diamond Glazing the back) if you want, but I don't see the need for it since these little guys are MUCH cheaper to replace if one should get wet/ruined.

To finish the backs of my magnets, I always use hot glue.  Because I'm impatient, really, but I've been using these magents for a long time and have never had an issue with the hot glue holding the magnet on.  Even if I did, I'd just hot glue it back on.  :)

*********

And that's pretty much it!  If you guys have any questions about any of the steps posted, please let me know.  I know it's easier to follow tutorials with photos, I'll do better next time.  Pinky swear.

Monday, December 27, 2010

Calling All Crafters...

2011 Monthly Craft Challenge

Want a way to get two dozen amazingly fabulous handmade items for yourself (or to give as gifts)?

I'm issuing a yearly craft challenge to anyone who wants to participate.  Here's the 4-1-1:
  • Make a list of 12 items you want to create (or want to learn to create) in 2011.
  • Each month, choose one of the items from your list and make TWO of them.
  • Pick your favorite of the two - keep it.
  • The other item will be packaged and shipped to a different swap partner each month (randomly chosen)
  • You, in turn, will receive 12 different items from others who are participating in the swap!

So fun, right?  :)

Since you'll be shipping these items (unless your swap partner happens to be local, which isn't guaranteed) I'd strongly advise keeping that in mind while making your list of crafts for the challenge... just a thought.

The challenge is officially open and I'll be taking names from now until January 1, 2011 of those who want to participate.  To join, leave a comment here!

Monthly Craft Challenge?

Let's talk New Year's resolutions, ladies... there's a bag making challenge going on over at JemJam that I'd reaaaaaally like to participate in but 1) I don't own Amy's book and 2) I don't really care for a lot of the bags included in it.

I'm thinking maybe we should all create our own crafty NY resolution... an item a month - something fabulous - and at the end of it all, you'll have 12 items to give as gifts for next year's Christmas season OR 12 amazing things to keep for yourselves... what do you think? What item(s) would you like to challenge yourself to make?

Thursday, December 23, 2010

Glass pedestals- blogged by Les

These glass pedestals are super easy to make! All supplies can be found at Hobby Lobby for a minmal expense, but I did this last year, so I can't remember exact prices.

You will need:
3 round wooden discs for the bases
3 unfinished wooden candlesticks of varying height (two of mine are actually the same height)
3 unfinished wooden finials
3 glass canisters with the silver screw on lids. (they really are pretty inexpensive)
twine
black paint (or whatever color you want)
hot glue
gorilla glue


First, paint all wooden pieces and the lid of the jars black.

Let dry (ugh. I HATE waiting. I am the most impatient crafter EVER)

Then, glue candlesticks to the middle of the round base discs with Gorilla Glue (this stuff is awesome, but does need some time to dry. ugh.)
Let dry.
While you're waiting on the glue to dry, use your twine and hotglue, and wrap around the lids.
After the twine is glued, use the Gorilla Glue to glue the finials to the top of the lids.
Let dry.

After pedestals are dry, you will need to glue the glass to the candle stick. This was the hard
est part for me. It took longer than I wanted to dry, and I wasn't sure the glue was working or it was enough glue so I added more, and then it all gooped up when it finally did dry, but since it was underneath, I just painted over it with black paint (told you I was impatient).

After EVERYTHING is dry, put it together and fill with whatever you want!
Now, if you want to be like me, just get some moss (from Hobby Lobby), put it in the bottom as a base. Then, cut out JOY in red cardstock, spray glue adhesive to the letters and cover with glitter, dump glitter, then spray adhesive over the glitter and dump glitter on it again. (I like things sparkly)
Merry Christmas!
Leslie


January Meeting Info...

For anyone planning on attending January's meeting, please head over to the Facebook group and see the latest post regarding the project kits!

There are 30 available for each project (photo charms and photo magnets) and each are $5 a piece. Before purchasing multiple kits, let's let everyone have a chance to get at least one of each (if they want it). I'll be posting a "last call" on FB next week before offering multiples!

EDITED TO ADD: Photos of the projects we'll be making next month!


Project #1 - Glass Photo Necklace Charm (with sterling-plated bail)


Project #2 - Glass Photo Magnet Set w/Tin (yes, I'm aware these aren't photos... I'll have TONS of cute patterns for us to use, in case you don't want to do a photo set)

Craft on, people.

Wednesday, December 22, 2010

Oh, you shouldn't have... but you did.

You guys ALL have that gift you give.  You know the one... the person who always brings you something even though you tell them not to.  They're the sweet people in your life who genuinely don't expect anything in return, too, that's precisely why you should do THIS for them... like I did.  :)


Oh yes. It's a gift basket with burlap, go on & pinch yourself. Just wait 'til you see what's inside...


Onto the goodies...


I'm a HUGE fan of repurposing everyday containers. In this case, a peanut butter jar. PS - you can totally remove that pesky "use by" date on your jars by using just a tiny bit of acetone (or maybe regular fingernail polish remover, too, though I've always just used acetone because I know it works for sure).

Here's how to make the cocoa mix:

1 cup nonfat dry milk powder
1/3 cup cocoa
1/3 cup sugar (or sugar substitute)

Mix all your ingredients in a large bowl and then transfer to your container.

Just for the record, I had to triple the recipe for my large peanut butter jar.  That filled it to the brim & we had enough mix left over for the kid to give it a test drive... he gave it an 8 on a scale of 1-10.  That's pretty good, if you ask me.


Type up a little "recipe" for your cocoa mix...


Make some treats.  For mine, I just melted almond bark and added in things... crushed candy canes, heath bar pieces, pretzel pieces, and peanut butter (hey, I had to empty the jar somehow).  I then spread out each on a sheet of wax paper & let it harden before breaking it into chunks.  For what it's worth,  I have a TON of these little kraft paper treat bags if any of you guys want a few...


Print tags (or hand-write them, I'm not a fan of my own handwriting, so I went the printed route) and label everything! Labeling everything makes it fancy. I like fancy.

To add another splash of fabulous, I also included "toppings" in small plastic baggies that I then tied around the lid of the cocoa mix.  I think that's cute.  And since it's my gift, then I get to call the shots on what's cute & what's not.

Tomorrow, I'll try to upload a printable PDF for the cocoa mix label & little tags... if you guys want it, that is! 

Go forth.  Make gift baskets.  Be merry.

Monday, December 20, 2010

Christmas Cookie Share - Potato Chip Cookies

This one's from Terrah!

Potato Chip Cookies

1 lb. butter
1 c. sugar
2 tsp. vanilla
3-1/2 c. flour
1 c. crushed potato chips

Mix well. Drop by tablespoons onto cookie sheet. Bake at 350 degrees for 10 minutes.